|
|
使用OpenCV的函数polylines()绘制多条相连的线段和多边形;使用函数fillPoly()绘制带填充效果的多边形
函数polylines()可用来根据点集绘制多条相连的线段,也可用来绘制多边形。
函数polylines()有两种原型,这里只向大家介绍比较常用的那种原型。
函数polylines()的C++原型如下:
- void cv::polylines(InputOutputArray img,
- const Point *const * pts,
- const int * npts,
- int ncontours,
- bool isClosed,
- const Scalar & color,
- int thickness = 1,
- int lineType = LINE_8,
- int shift = 0 )
函数polylines()的Python原型如下:
- img=cv.polylines(img, pts, isClosed, color[, thickness[, lineType[, shift]]])
函数polylines()的参数意义如下:
img—绘制的多条相连线段或多边形所在的图像。
pts—存放点集坐标的二维数组,它是一个指针的指针,要注意的是在Python-OpenCV中,其中每一个坐标的数据类型为int32,而不能为常用的uint8。
npts—代表有几组点集。
ncontours—代表有内个轮廓。
isClosed—是否把绘制的多条线段首尾相连,显示,如果要绘制多边形,则这个参数值该置为true。
color—线条的颜色,用三通道表示。
thickness—线条的粗细,这里不能取负值。
lineType—线条的类型,默认值为LINE_8。
shift—坐标值的小数位数。
函数fillPoly()用于在图像上绘制带填充效果的多边形。
函数fillPoly(也)有两种原型,这里也只向大家介绍比较常用的那种原型。
C++原型如下:
- void cv::fillPoly(InputOutputArray img,
- const Point ** pts,
- const int * npts,
- int ncontours,
- const Scalar & color,
- int lineType = LINE_8,
- int shift = 0,
- Point offset = Point() )
Python原型如下:
- img=cv.fillPoly(img, pts, color[, lineType[, shift[, offset]]])
参数意义如下:
img—绘制的多边形所在的图像。
pts—存放多边形顶点坐标的二维数组,它是一个指针的指针,要注意的是在Python-OpenCV中,其中每一个坐标的数据类型为int32,而不能为常用的uint8。
npts—代表有几组点集。
ncontours—代表有内个轮廓。
color—线条的颜色,用三通道表示。
lineType—线条的类型,默认值为LINE_8。
shift—坐标值的小数位数。
offset—所有多边形顶点坐标的偏移量。
这两个函数的Python示例代码如下:
[Python] 纯文本查看 复制代码 # -*- coding: utf-8 -*-
# 出处:昊虹AI笔记网(hhai.cc)
# 用心记录计算机视觉和AI技术
# 博主微信/QQ 2487872782
# QQ群 271891601
# 欢迎技术交流与咨询
# OpenCV的版本为4.4.0
import numpy as np
import cv2 as cv
if __name__ == '__main__':
img1 = np.zeros((200, 400, 3), dtype='uint8')
img2 = np.zeros((200, 400, 3), dtype='uint8')
img3 = np.zeros((200, 400, 3), dtype='uint8')
pts = np.array([[150, 33], [263, 40], [330, 100], [321, 180], [118, 90]], dtype='int32')
# 使用函数polylines()绘制多边形
cv.polylines(img1, [pts], True, (255, 0, 0))
# 使用函数polylines()绘制多条线段
cv.polylines(img2, [pts], False, (255, 0, 0))
# 使用函数fillPoly()绘制带填充效果的多边形
cv.fillPoly(img3, [pts], (255, 0, 0))
cv.imshow('img1', img1)
cv.imshow('img2', img2)
cv.imshow('img3', img3)
cv.waitKey(0)
cv.destroyAllWindows()
运行结果如下:

这两个函数的C++示例代码如下:
[C++] 纯文本查看 复制代码 //出处:昊虹AI笔记网(hhai.cc)
//用心记录计算机视觉和AI技术
//博主微信/QQ 2487872782
//QQ群 271891601
//欢迎技术交流与咨询
//OpenCV版本 OpenCV3.0
#include <opencv2/opencv.hpp>
#include <iostream>
using namespace std;
using namespace cv;
int main()
{
Mat A1 = Mat::zeros(200, 400, CV_8UC3);
Mat A2 = Mat::zeros(200, 400, CV_8UC3);
Mat A3 = Mat::zeros(200, 400, CV_8UC3);
Point polyPoints[1][5];
polyPoints[0][0] = Point(150, 33);
polyPoints[0][1] = Point(263, 40);
polyPoints[0][2] = Point(330, 100);
polyPoints[0][3] = Point(321, 180);
polyPoints[0][4] = Point(118, 90);
const Point* pts1[1] = { polyPoints[0] };
const int npt[] = { 5 };
//使用函数polylines()绘制多边形
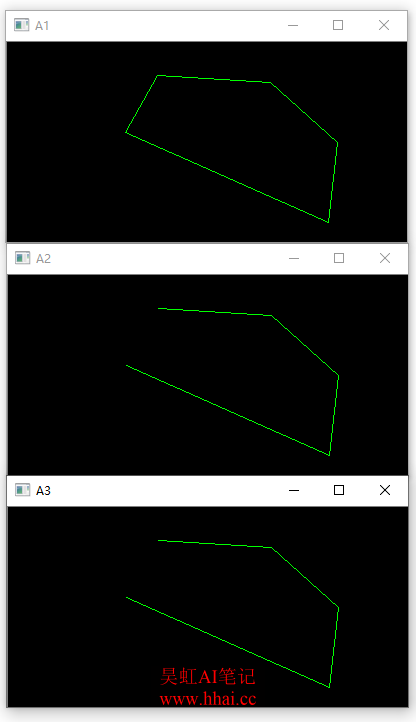
polylines(A1, pts1, npt, 1, true, Scalar(0, 255, 0));
//使用函数polylines()绘制多条线段
polylines(A2, pts1, npt, 1, false, Scalar(0, 255, 0));
//使用函数fillPoly()绘制带填充效果的多边形
fillPoly(A3, pts1, npt, 1, Scalar(0, 255, 0));
imshow("A1", A1);
imshow("A2", A2);
imshow("A3", A2);
cv::waitKey(0);
return(0);
}
运行结果如下:
 |
|


